<img height="1" width="1" style="display:none" src="https://www.facebook.com/tr?id=1900679320197204&amp;ev=PageView&amp;noscript=1">

News

Integrating Online and Offline Channels

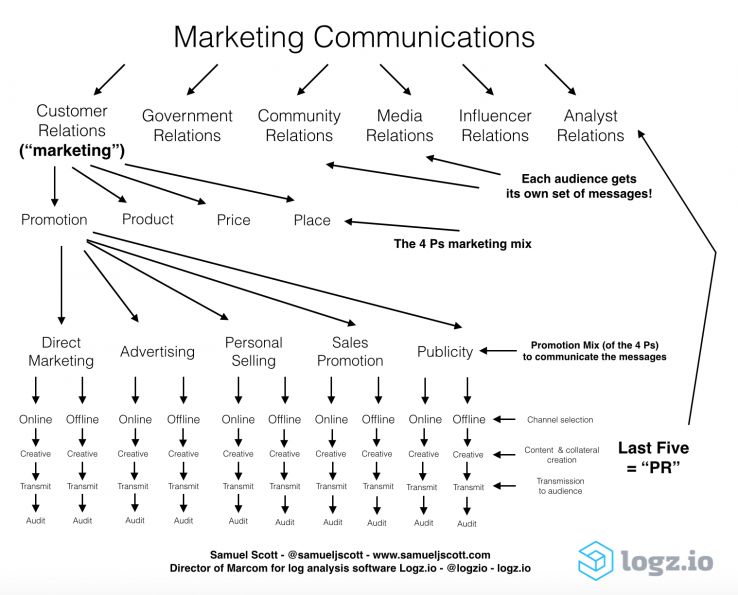
Elsewhere, I have written on how marketers and communicators should operate in a world with numerous available traditional and digital channels. Here is a flowchart that summarizes my process:

The overall theory: Segment the target demographic and create a persona. Decide the 4 Ps. Create an overall strategy that assigns weights to each part of the Promotion Mix. Choose the messaging. Select the best online and offline channels. Produce the marketing collateral. Transmit to the audience. Measure the results.

But the problem is when online marketers often drink their own digital Kool-Aid, ignore traditional channels and exaggerate the effectiveness of modern channels. (And I’m not even taking all of the online advertising fraud in the industry into account.)

Remember Oreo’s famous Super Bowl tweet? Ritson ran all of the numbers and calculated that it was seen by less than 1 percent of Oreo’s target market. And that example is held up as “social media marketing” at its very best. In another example from Hoffman, Pepsi lost enough market share to drop to third when it moved its budget from TV to social media.

But social media consultants and agencies are always going to say that “social media is the answer,” because their livelihoods depend on it — even though Ritson notes that it is often not the answer and Hoffman says, perhaps too bluntly, that it’s part of modern marketing’s bull—-. Digital video platforms are always going to claim that “TV is dying” because their success depends on it — even though TV has never been more popular than it is today.

Few take the time to research the facts, and instead just regurgitate whatever spews forth from the digital marketing echo chamber. And most people are selling something. An advertising consultant or SEO agency is always going to say, respectively, that advertising or SEO is the solution to everything.
 

Read More

How Google Analytics Pushed Everyone Online


Read More

How Google Analytics Changed the Buckets


According to W3TECHS, Google Analytics is used by 55 percent of all websites and has a traffic analysis tool market share of 83 percent. More than half of those websites use GA as their only source of marketing data.

Google transformed the marketing industry. However, the introduction and widespread adoption of GA pushed marketers to change their focus from the strategy to the channel (this is a screenshot from an old client of mine back when I was a consultant):

Traditional marketing allocates activities based on the strategies that comprise the traditional Promotion Mix: direct marketing, advertising, personal selling, sales promotion and publicity. Google Analytics replaced those “buckets” with these entirely new ones: direct, organic search, social, referral, paid search, email and display.

However, that shift in assumption has led to poor marketing because almost any strategy can be executed over any channel — and it is strategies, not channels, that have associated best practices and deliver results.

Take “social media marketing,” a vague, useless phrase that refers to channels but not to any specific strategy:

  • Direct marketing campaigns (that are inaccurately called “advertising campaigns”) get direct responses from a specific set of people on social media based on their demographics and what they “like”

  • Advertising campaigns put paid media published by an identified sponsor in front of a mass audience on social media

  • Publicity campaigns gain mass exposure through earned or owned media that is spread on social media

  • Personal selling campaigns have salespeople contact prospects and leads over social media

  • Sales promotion campaigns circulate coupons, discounts and codes on social media to generate immediate sales

Each of these five things can be deemed “social media marketing” — but when a term means everything, it means nothing. The five traditional strategies have best practices, as well as times and places to use — and NOT to use — them within an overall marketing plan.

To ask “What is the ROI of social media?” makes as much sense as asking “What’s the ROI of the telephone?”

By not using and knowing the traditional terminology that the marketing industry uses for precise reasons, marketers are only hurting themselves and their own campaigns.

When one now looks at Google Analytics and sees the results, for example, in the “Social” bucket, it’s rarely clear which of these strategies and activities delivered which results. The same is true for almost all of the “buckets” that appear in online marketing analytics. The strategic activity matters more than the communications channel. The channel merely dictates the format of the marketing collateral and content that one creates within an overall strategy.

To ask “What is the ROI of social media?” makes as much sense as asking “What’s the ROI of the telephone?” Activities, not channels, generate ROI. But after Google Analytics and every other marketing platform defined “social media” and other channels as buckets, and therefore as marketing strategies, people have confused strategies and channels ever since.

The positive thing about GA is that we can know which channels tend to perform the best. The negative thing about GA is that we know less about which specific, overall strategies and activities over those channels lead the best results.


Download It's Not the Market, It's Your Marketing 
Read More

The Traditional Marketing Analytics Buckets


Marketing campaigns have always involved the creation of a message, the insertion of that message into a piece of content and the transmission of that content over a channel to an audience.

And as I wrote in my prior, much-discussed TechCrunch column that discussed how too many marketers in the tech world do not understand basic marketing terminology and practices, that overall process occurs within the strategic frameworks of the five “buckets” within the Promotion Mix (“promotion” is one of the four Ps in product marketing): direct marketing, advertising, sales promotion, personal selling and publicity.

In this lengthy tutorial on integrating traditional and online marketing on Moz, I described how each of these “buckets” has pros and cons, as well as best practices:

When marketers brainstorm campaigns, they typically ask these questions, in this order:

  1. Who is our target audience and what are our goals?

  2. What is the best message for that audience?

  3. In light of our goals, which strategies within the Promotion Mix — advertising, direct marketing, sales promotion, direct selling and publicity — should we use to communicate that message?

  4. What are the best online and/or offline channels for that strategy to reach that audience?

  5. What marketing collateral and creatives should we create and transmit based on the answers to the prior four questions?

  6. How can we measure the results based on which metrics are relevant to each strategy within the Promotion Mix that we will use?

The strategy, message and marketing collateral matter more than the channel.

Here’s a publicity example. Say that someone uses the various tactics that I describe in my publicity tutorial on Moz to get a New York Times reporter to write about his company. The resulting article will appear in print, on the website and on the Amazon Kindle. The article will be spread on social media and shared in online forums and news aggregators. And so on. This is why there is actually no such thing as “digital PR.” It’s just “PR.” The best publicity practices to get coverage never change, regardless of the channels over which the coverage will appear.

It is strategies, not channels, that have associated best practices and deliver results.

Here’s a direct marketing example. Say that one writes advertising copy to generate direct-response leads. That same copy will often deliver similar results — subject to specific, individual format restrictions of each channel — across platforms, including direct mail, email, Facebook ads and Google AdWords, because human nature does not change.

There is no “digital marketing” and “traditional marketing.” There is only marketing — just ask Campbell’s, which has now consolidated all offline and online work under the CMO.


Download It's Not the Market, It's Your Marketing 
Read More

4 Sales Funnel Stages Where Prospects Quickly Fall Out Of Love With You

There’s something comforting about the traditional sales funnel stages for B2B salespeople and marketers. You know that if you toss a certain number of leads in at the top, you can expect a (small) percentage of deals to shake out at the bottom.

It’s just like lining up tons of online dates hoping to find ‘The One’.


I think I have some pipeline problems…

However, the good ol’ sales funnel isn’t holding up as well as it used to.

Buyers (and daters) are more empowered by choice and technology—which makes them more skeptical (and picky) than ever before. Over two-thirds of buyers wait longer to contact vendors than they did a few years ago because they’re doing more of their own research.

The reason? They’re scared to make a wrong decision. No one wants to waste time and resources, especially if it means losing their job (or getting dumped—not sure which is worse). And, in these digitally-connected days, there’s no excuse for not doing in-depth vendor research.

Let’s hope the next person you date NEVER sees your search history.

All of this means your sales funnel stages (or dating pipeline) is a minefield of potential relationship killers and exit points.

Is this seriously the best email nurture you could write? I’m done.

Read on to learn why and where your prospects are dropping out of your pipeline, and how to prevent them from straying. (Consider the dating advice a free bonus!)

1) Flirting: the awareness stage

Getting someone’s attention in a crowd can be tough, no matter how tight your value prop is.

Unless you’re this person:

No one can resist gold lamé. It’s a fact.

It doesn’t matter what your reps or marketing messages say; prospects don’t trust them. If buyers haven’t heard of your product or talked to someone who has used your product, they won’t feel comfortable giving you their contact info or answering a cold call.

How to get their digits: Don’t be an unknown to your prospects. This doesn’t mean plastering your logo everywhere or posting more from your corporate social media accounts.

Get some mutual friends to intervene on your behalf: your brand advocates. If you uncover these super fans, and treat them right, their genuine enthusiasm and product expertise will ease your prospects’ buyer doubt at every stage in the sales funnel.

Incentivize your advocates to make introductions to their peers—who likely have potential matches for your brand in their Rolodexes. Starting a referral program, or running a referral contest, can help you kickstart the process. The key is making sure you thank your advocates in an appropriate way for making an introduction—especially if it turns into new business.

2) Dating: the interest stage

So buyers have heard your name. Big deal. They’ve still got lots of choice, and they will string you along until they’ve made a decision.

Why is love—and B2B sales—so cruel?

While you may have potential to make the vendor shortlist, they need to know that you can deliver on your promises. And it’s going to take more than a few case studies to make that happen, especially if they want their friends’—err, I mean coworkers’—approval before they make a choice.

You need to surround your prospects (and all key decision makers) with social proof from people they trust. It’s even more powerful when it comes from channels you don’t own. A hand-picked testimonial on your website isn’t enough.

Courting your prospects: Make sure your online reputation on 3rd-party resources—like review sites, industry forums and social media—is pristine. If prospects only find negative comments—or nothing at all—in these places, they’ll suddenly become really busy, you know, because work is so hectic right now, and they just aren’t sure what they want anymore…

To present yourself as a safe bet, encourage your customer advocates to write genuine reviews when they’ve reached a certain level of expertise with your product. You can also direct them to discussion threads about your product or industry where they can showcase their knowledge.

If you position the request as a chance to boost their professional profile, they’ll be appreciative. Make sure to internally and externally recognize them for their help. Feature their comments in a newsletter, blog or a thank you tweet to keep the buzz going.

3) Ready to commit: the decision stage

What happens when a buyer is ready to seal the deal, but can’t find a good reference to confirm your sales rep’s promises right away? They get spooked.

My mom is very objective. Plus, her raisin muffins are THE BEST!

The problem with references is prospects often demand to talk to *really* specific ones. It can take your team days to search Salesforce for a senior manager in an identical vertical at a company with a similar team size, business model, revenue level and location. Oh, and who is really happy with your product/service right now.

Sealing the deal: Most reference programs don’t help you continually (and easily) uncover new, relevant customers for your prospects to talk to. They also don’t prepare customers to be superb references. If you want to make sure you can quickly turn around reference requests, you need to do a few things:

  1. Have a way to continually invite and uncover new references so you don’t burn out the handful of customers you always turn to
  2. Make reference requests a volunteer opportunity, and position them as a chance to network with others
  3. Continually engage and educate references so they can easily and happily discuss your product

This means setting up new systems for grooming references and making sure the process is valuable for everyone involved. 

4) Marriage: the retention stage

What happens after your prospects say “I do”? Usually, this is the moment sales and marketing disappear. That’s a shame, because oftentimes, a buyer’s anxiety kicks in soon after that new signing glow fades—especially if on-boarding doesn’t go smoothly.

Now, all the promises made during the buying process are left to the customer success and support teams to fulfill.

“Aaaaand half of the features in this contract aren’t out of beta…”

Retention is the most ignored stage of the sales funnel. If you aren’t actively engaging new customers from Day 1, their insecurity will grow. Then, by the time contract renewal rolls around, they’ll churn.

More importantly, these neglected customers won’t help fuel your sales funnel stages by advocating for you.

Keeping the honeymoon phase alive: Make sure you’re regularly educating your advocates and helping them build connections with your team and each other. You can do this by building an online community and hosting local meet-ups. If you give your advocates personal connections and opportunities to grow, they’ll be more inclined to stick around and become vocal champions for your brand.

 Download It's Not the Market, It's Your Marketing
Read More

Need to Sell to Millennials? Video is the Answer.


Read More

Why Video Will Rule Your Inbound Strategy in 2017


When you’re browsing your favourite sites and social media online, what kinds of content do you consume most?

Read More

WEBSITE TRAFFIC DOWN? 3 INBOUND MARKETING FIXES THAT PAY OFF BIG!


Need Traffic This Week? Here Are Inbound Marketing Tactics To Put People On Your Site Today

Inbound marketing is great, but what are you supposed to do if you need to increase website traffic and visitors to your website? No matter how many offers you add, if you’re only seeing 300 visitors a month even the best-converting sites would deliver a meager 10 leads. And if only 10% are sales-ready leads, that’s just one sales opportunity a month. Not the kind of mind-blowing results inbound promises.

The answer is to quickly drive new visitors to the site and maintain a high conversion rate. This might require an extra budget, but if the return is there you should be comfortable investing a little extra money to get a big return in a short amount of time.

Hold on to your hats, here we go.

Read More

3 Mistakes To Avoid When Investing With Friends And Family

If you are thinking about investing in a property with a family or friend, there are certain benefits that can make it an attractive way to build your real estate portfolio.

Read More

How to Create the Perfect Facebook Page for Your Business: The Complete A to Z Guide

Facebook now has over 1.65 billion monthly active users. And as small business owners and brand managers, there’s a very good chance you’ll be able to reach and connect with your target audience through Facebook.

Great! So where should you start? And is there an easy blueprint to follow?

From creating our Facebook Business page to posting several hundred times over the past few years, we’ve experimented a lot with various Facebook marketing tips and have enjoyed figuring out the best way to create and manage our Facebook page here at Buffer. I’d love to share with you how the process has worked so far from start until now!


Since things continue to change regularly with Facebook and its algorithm, consider this A to Z guide as a great jumping off point for creating a Facebook business page and growing your audience. Start here, test what works for your individual business and brand, and make changes as you learn.

How to Create a Facebook Business Page in 5 Simple Steps

Step 1: Fill out your basic business info

Open the following URL to create a business page on Facebook:

https://www.facebook.com/pages/create.php

Once there, you’ll choose one of the following six categories for your page:

  1. Local business or place
  2. Company, organization, or institution
  3. Brand or product
  4. Artist, band, or public figure
  5. Entertainment
  6. Cause or community

Keep in mind that you can change the category and name later on if needed.

Also, at this stage, it might be helpful to know that a physical address figures prominently in the setup of a local business or place, and the actual Facebook page will appear differently as well.

Here’s the look for a local business:

Here’s the look for a company or brand:

It’s something to think about when choosing a category.

Following the category selection, the next setup screen will ask for a descriptive sentence or two about your page, a URL, a Facebook page URL, and a profile picture. If you’ve selected a local business, you’ll also have the ability to select category tags to further define what your store sells.

About your page – You get 155 characters to describe your page. This description appears prominently near the top of your Facebook page on both desktop and mobile. Be as descriptive and helpful as possible.

URL – The web address for your store, company, or brand.

Facebook URL / username – You may have the option to choose a custom vanity URL for your page, i.e. facebook.com/yourbrandname.

(Facebook will ask that you reach 25 fans first before you can unlock a custom Facebook URL)

Profile picture – Upload a main profile picture/icon for your page. This photo will appear as your icon every time you comment on a post or publish in a news feed. Square dimensions are best. Facebook will force rectangular photos to be cropped to squares.

Profile pictures should be at least 180 pixels wide by 180 pixels tall. Here is a full list of the sizesthat Facebook uses for your profile picture in various places around the site:

  • The main profile image on your page – 160 x 160
  • In a news feed – 100 x 100
  • In your timeline – 86 x 86
  • Next to comments – 43 x 43

The final two steps in the setup process include adding your page to your main Facebook menu (so you can access it quickly and easy each time you log in) and setting up a Facebook ad to promote your new page. These options can be skipped for now.

Step 2: Create an awesome cover image in a snap (no designer required!)

By this point, your page is live for all the world to visit. Let’s see if we can make it look even snazzier.

First thing, add a cover photo. The cover photo appears across the top of your page and is a great opportunity to deliver a visual element that supports your branding, draws attention, or elicits emotion from your visitors. 

A note on ideal Facebook cover photo size and dimensions: 

Facebook cover photos appear at 851 pixels wide and 315 pixels tall on desktop, however, Facebook crops out some of each cover photo on mobile devices. It specifically strips out 144 pixels off the right and left sides of the image.

Therefore, Facebook cover photo dimensions are 851 x 315px, but only the center 563 x 315px portion of the picture appears on mobile.

You can certainly hire a designer to make you something fabulous, or you can go the DIY route. Many photo editing apps like Pic Monkey or BeFunky can help with creating images of just the right dimensions. If you’re a Photoshop user, we’ve created a couple of Facebook cover photo templates that might be helpful. Canva is another super helpful tool for Facebook cover photos as it comes with several premade templates that look great right out of the box.

Here’s an example of a Canva template you could choose. You can upload your own image to use as the background, and you can edit the text to say whatever you’d like. If you’re looking for high-quality image options, we’ve compiled a list of our favorite sources for free social media images.

Once you have created your cover image, upload it to your page by clicking on the “Add a Cover” button.

If you happen to upload an image that isn’t quite the exact dimensions of the Facebook cover, you’ll have a chance to move and edit the image to fit the available window. When you’re happy with the final look, you can click “Save Changes,” and you’ll be set!

Here’s a pro tip: When you upload a cover photo to your page, the photo is added as an update to your timeline. If you edit the description of the photo, you can add a message to the update. Click on the photo to open up the photo viewer, and you’ll notice a link that says “Add a description.”

You can add description, tags, location, and date to your photo. Once you’ve finished, the update to your timeline will be changed to reflect your edits.

Step 3: Fill out your profile completely

Next, you can fill out your profile even more by adding information to your Page Info section. To access this section, click on Settings in the top menu bar on your page, then click Page Info.

Your name and category will be filled in already. Some of the most helpful bits of information to add next might be:

Start Info – You can choose when your company or product was founded, created, started, or launched. This information will appear on the history timeline to the right of your page’s feed and as an update at the very bottom of your main feed.

Address – Enter this if you want people to be able to check in via Facebook when they’re near your place.

Long description & Mission – Add additional details that explain your business or brand even further. This is a great way to go beyond the 155 character description that appears on the main page.

Phone number / Email address – Add additional contact information.

All of these details will appear on the About tab of your Facebook page.

Step 4: Add collaborators to your page

If you plan on sharing your Facebook marketing duties with a team, you’ll want to grant access for various folks and various roles.

Here are the roles that you can choose from:

Admin – Complete and total access to everything (you are an admin by default)

Editor – Can edit the Page, send messages and post as the Page, create Facebook ads, see which admin created a post or comment, and view insights.

Moderator – Can respond to and delete comments on the Page, send messages as the Page, see which admin created a post or comment, create ads, and view insights.

Advertiser – Can see which admin created a post or comment, create ads and view insights.

Analyst – Can see which admin created a post or comment and view insights.

To add collaborators, go to your page settings and the “Page Roles” section. You can type in the name of any Facebook friend or person who has liked your page. Alternately, you can type in an email address associated with a Facebook account.

Step 5: Publish your first post

Add content to your page by publishing a post—a status update, a link, a photo, a video, an event, or a milestone. New, fresh content on your page will make it look all the more enticing once new visitors come over to check it out.

Keep in mind that visual content does exceedingly well and that Facebook is now ranking Live Video higher in people’s news feeds.

Here’s a telling graphic from a BuzzSumo study showing how Facebook posts with images receive2.3x more engagement than those without photos.

And there you have it!

Your Facebook Business page is up and ready to deliver awesome content to your fans and grow into something wonderful.

Read on to learn more about growing your Facebook page and posting best-practices!

How to gain your first 100 fans to your Facebook page

The temptation might be to share your Facebook page right away with all your Facebook friends. Not so fast. Take a moment to think strategically about your plan and to seed your page with content so that it looks inviting and engaging when visitors do stop by.

Publish three to five posts before you invite anyone. 

Then try out one of these strategies to get to your first 100 fans.

Invite your Facebook friends

Facebook has a built-in feature to tell your Facebook friends about your page. Click on the Build Audience link in the top right corner of your page, and choose Invite Friends from the dropdown.

You can then pick and choose which friends you’d like to invite, and you can drill down into specific sections of friends, filtered by location, school, lists, and recent interactions.

Once invited, your friends will receive a direct message with an invitation to your page. You won’t have a chance to edit the message they receive.

Invite your coworkers

One of the best sources of social media promotion for your company could very well be your coworkers. Ask everyone who works with you to like the page and—if willing—to recommend the page to any friends who might be interested.

Promote your Facebook page on your website

Facebook offers a full complement of widgets and buttons that you can add to your website to make it easy for website visitors to like your page.

One of the most ubiquitous plugins is the Facebook Page Plugin. With Page Plugin, you can easily embed and promote any Facebook page without visitors ever having to leave your website.

Promote your Facebook page in your email signature

One of the most visible places you might find to promote your page is in your inbox. Edit your email signature to include a call-to-action and link to your Facebook page.

Hold a contest

Facebook contests can be huge for gaining likes on your page. Two of the best apps for creating contests are ShortStack & Gleam which help you create custom campaigns to drive Likes to your page (or email capture or fan engagement or any number of different ideas you might have).

What to post and when to post it

In general, there are three main types of posts you’re likely to publish on your Facebook feed:

  • Photo/video
  • Text update
  • Links

As mentioned above, posts with photos garner 2.3x more engagement than posts without photos. 

Definitely make visual content a huge part of your Facebook strategy as well as your larger social media marketing plan.

As far as the frequency with which to post, Facebook’s algorithm changes have made research into the topic rather difficult. The consensus seems to be to experiment as much as possible. As often as you have fresh, compelling content to share on Facebook, give it a try. Try testing post frequency in week-long intervals so that you can measure the results quickly.

With that, we recommend being consistent with your content. When your content is good, your audience will start to expect it on a regular basis. Even if you’re only producing enough content to post to Facebook once per day, try to stick to that schedule.

Social media scheduling apps like Buffer help make this easy by letting you schedule posts ahead of time. You can add to a queue so that your page always has fresh content being posted automatically on schedule.

Ideal length and timing of Facebook posts are another area you might want to experiment with.

HubSpot collected a ton of research from the folks at CoSchedule and from a variety of sources, including QuickSprout, SurePayroll, The Huffington Post, Buffer, TrackMavenFast Company, andKISSmetrics.

Their takeaway:


As far as ideal length, we partnered with our friends at SumAll to place the data and insights into a fun infographic. What we found was that Facebook posts with 40 characters receive 86% more engagement than those with a higher character count. 

How to tell what’s worked and what hasn’t

After sharing posts, you’re likely to want to know how they did. Your social media management tool would figure to have some built-in analytics that can help you better understand how your posts performed. Here’s a peek at what the Buffer for Business analytics look like:

You can also gain a huge number of stats and numbers from Facebook Insights.

Once you’ve shared several pieces of content to your Facebook page, you’ll see an Insights tab at the top of your Facebook menu, between Activity and Settings.

At the top of the Insights page, you’ll see your Page Likes, Post Reach, and Engagement stats for the week, along with a comparison to the same stats from last week.

Another neat area to check is the demographic information on the people who visit and engage with your page.

Click on People from the Insights menu, and you can drill down into demographic information of your fans, the people reached by your posts, the people who engage with your post, and the check-ins you receive at your physical location.

Here’s an example from Buffer’s page insights about the people reached by our posts.

One of the newest features of Insights is the “Pages to Watch” section at the bottom of the page. You can add other pages that you want to monitor—a great way to grab some competitor research and take inspiration from the way that other pages market themselves.

To add a page, simply click on the Add Pages button at the top of the section.

Search for the name of the page you want to watch, then click to add it to your watch list. Once a page has been added, you can click on the name of the page from your Insights dashboard, and you’ll see an overview of their best posts from the week.

Read More

Topics: Sales and Marketing, sales, sales leads, Leads, app, real estate, marketing, Roman Badnarchuk, lead generation, Sales Training, N5R Sales Training, marketing agency, Top condo sales trainers

Contact

Toronto
99 Yorkville Avenue
Suite 200
Toronto, Ontario
M5R 1C1
(416)220-5314

roman@n5r.com

Follow Us

Register for Updates